
We have a time to do our bathroom reno! Bring on mid February.
It's funny to look back and see how our layout and design ideas have changed over the past year and a bit (you can see some evidence of that by looking through these posts). Although it's been a frustrating wait, it's probably been a good thing that we didn't dive in head first. Taking things slow (and being delayed), has given us a chance to really hash out what we want and don't want, what's a must have, and what's a "that'd be nice". On the downside, we've had a lot of time to nit pick - and maybe argue a time or two - about fixture finishes, tile choices, and probably anything else you can think of. But that's the reality of reno'ing as a couple when both parties are interested in the design and a nice looking final product, rather than just a functional final product.
Despite all my jabbering on about layouts some time ago (here and here), we discovered that the last arrangement we had decided on was not going to work. So back to the drawing board I went, except this time I used a neat web-based application called Autodesk Homestyler. Once you`ve made an account, you can create a limited number of designs for free, and even save them. It`s come in incredibly handy - I could draw the room with pretty much the exact dimensions of our bathroom, and many of the fixtures (tubs, vanities, windows, etc) are customizable to make sure that you`re seeing a fairly true to scale representation of your room. You can also toggle between 2D and 3D to make sure you're getting the whole picture.
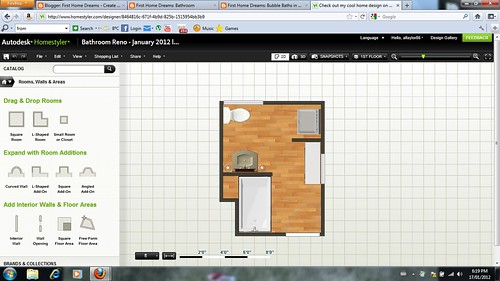
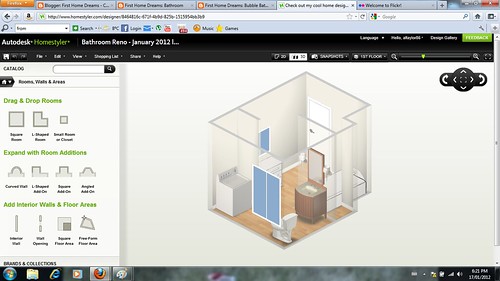
While we have a huge room to work with (around 95 square feet), gutting and rebuilding this room from scratch has it's challenges. In addition to being our (only) bathroom, it's also doing double duty as the laundry room. We're not interested in moving windows, and we would prefer the stacking laundry pair to be placed on an exterior wall (so we don't have to mess around too much with venting the dryer). We would also really prefer to keep the toilet where it is. We're trying to keep this complicated project as uncomplicated as possible! We also have a turtle aquarium to deal with. Yep.
You probably noticed in the first picture above that there's some dead space on the left hand side, beside the tub and behind the vanity. We haven't decided what to do with that yet. We'll either "reclaim" it for the living room when we get around to doing that room, or throw in a built in linen cabinet (which totally has my vote!!). Whether we can add a linen cabinet will depend on the size of the vanity that we end up with.
And on that note, I'm not sure what's going to happen with building my own vanity. I might be abandoning that project. I also might give it a shot, since I have a month before we actually start the reno. If it works out, great! If not, well, it wouldn't be the end of the world. We'll see.
Since this project actually has a real hope of starting sometime soon (ish), it's time for a list.
Bathroom Reno (in no particular order):
- gut entire room, including floor
- take salvagable fixtures to Habitat for Humanity Restore
- buy new hot water tank, relocate to basement
- sister existing joists
- lay new sub floor
- frame out new walls
- re-route all plumbing, using pex
buy floor tile, tile floor- buy tub, install
- buy tub alcove tile, tile alcove
- buy tub/shower trim kit, install
- build/buy vanity, install
- buy sink faucet fixture, install
buy mirror(see below), hang- hang drywall
- mud drywall
buy exhaust fan, installbuy toilet, install- sand and repaint all existing baseboards and casings
- restore big window
- find a stained glass window for the little window
buy stacking washer and dryer, hook up- sand and repaint original door, put original hardware back on
- pick a paint colour, paint
- pick an over head light fixture, install
- pick vanity light fixture, install
Which brings me to our mirror that we bought just the other night.
Originally I wanted a medicine cabinet, but the more our design evolved, the more I realized that it just wasn't going to fit in with the rest of the room. So we picked up this little gem for a wicked deal.

Picture via Faucet Direct.
 Logging you in...


Kate · 701 weeks ago
Ashley 94p · 701 weeks ago
I always dreamed about a fixer upper, too. Probably comes from the fact that my parents (and therefore me) have always live in fixer uppers and made them wonderful.
When I first started using Homestyler, it didn't have as many options for fixtures but it's much better now.
Thanks for commenting!
chelsey · 701 weeks ago
Ashley 94p · 701 weeks ago
Exciting to hear that you might be in your own home soon, can't wait to hear about it when you do get one! What area are you looking in??
chels · 701 weeks ago
Ashley 94p · 701 weeks ago
wrіtіng servіces · 523 weeks ago